Connect and Register Device
This page will walk you through the complete process of connecting your device and cables, and registering your device to your AutoNetTV account. Once you've completed these steps, any changes you make to your playlist/program online at http://Drive.AutoNetTV.com will be reflected via the media player on your TV screen.
Connecting the Cables and Device
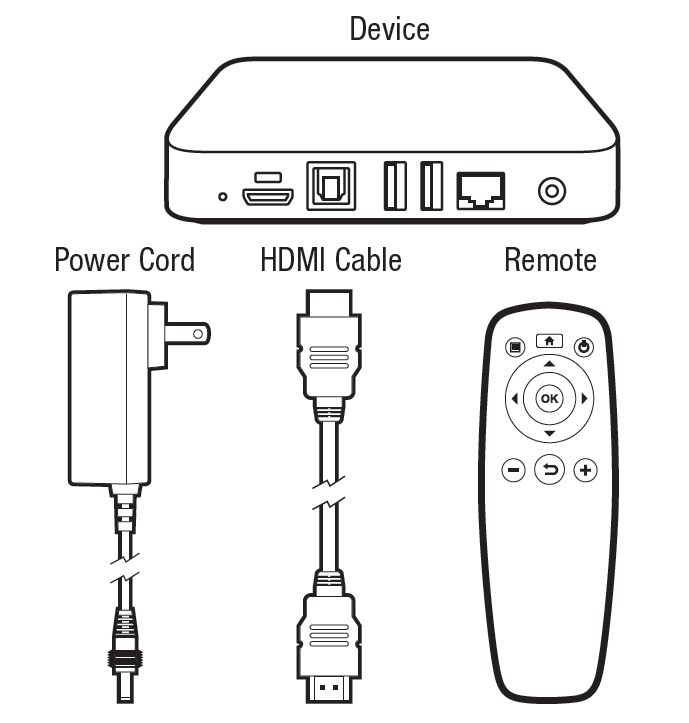
After you sign up for a Drive subscription, you’ll soon receive a media player (or device), and the accompanying items shown here:
Your first steps are to connect your device to your TV, power, and your internet connection. Follow these steps:
HDMI
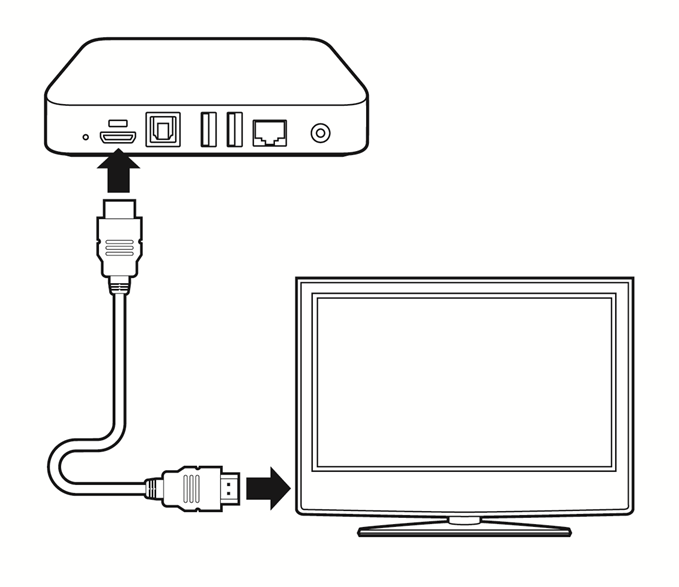
Connect one end of the included HDMI cable to the media player, and then into an HDMI port on your TV. Please note the port you’re using on your TV (some TVs have 3 HDMI ports – and you’ll need to choose the port # on your TV Remote Control in order to display the right “channel”). The HDMI cable carries both video and audio output.
Ethernet cable
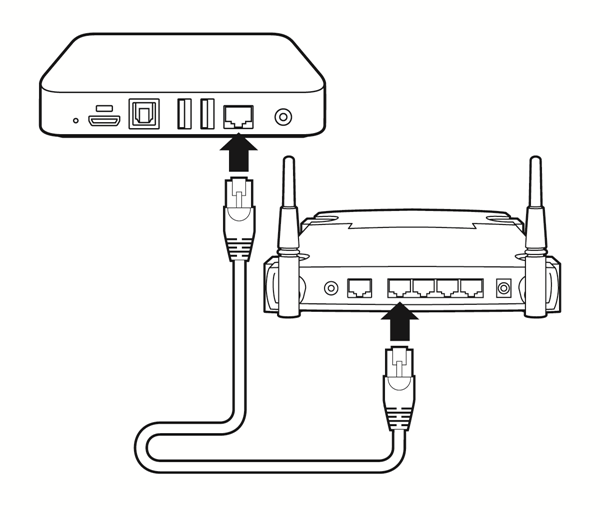
For Wired internet (only if this is how you’ll connect the device), use your own Ethernet cable (not included) and plug it into the Ethernet port on the back of the device, and then into your network port – which may be in a wall outlet, or an open port on your internet router. Wireless (Wi-Fi) connectivity info shown later. For advanced/technical Internet questions or issues, please visit http://support.autonettv.com/lists/2-drive-products-knowledge-base/?category=8.
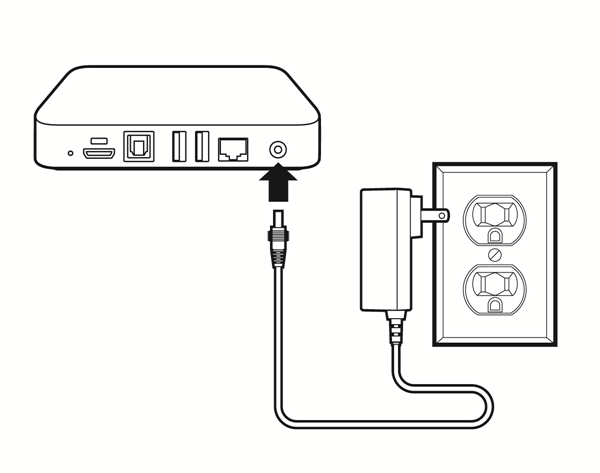
Power Cable
Plug the small end of the included power cord into the back of the device, and then plug the large end into a surge protector outlet (or a power strip). Once plugged in, the device will automatically turn itself on and start.
TV
Turn on your TV and choose the input/source port into which you plugged the device (such as HDMI 1, or HDMI 2). The Input or Source option is always located on the TV remote control, and also often located on the TV itself.Registering the Device
Before you try to register your device, you must have the following:
- A broadband Internet connection (for speed requirements, visit http://support.autonettv.com/topics/49-recommended-internet-requirements/)
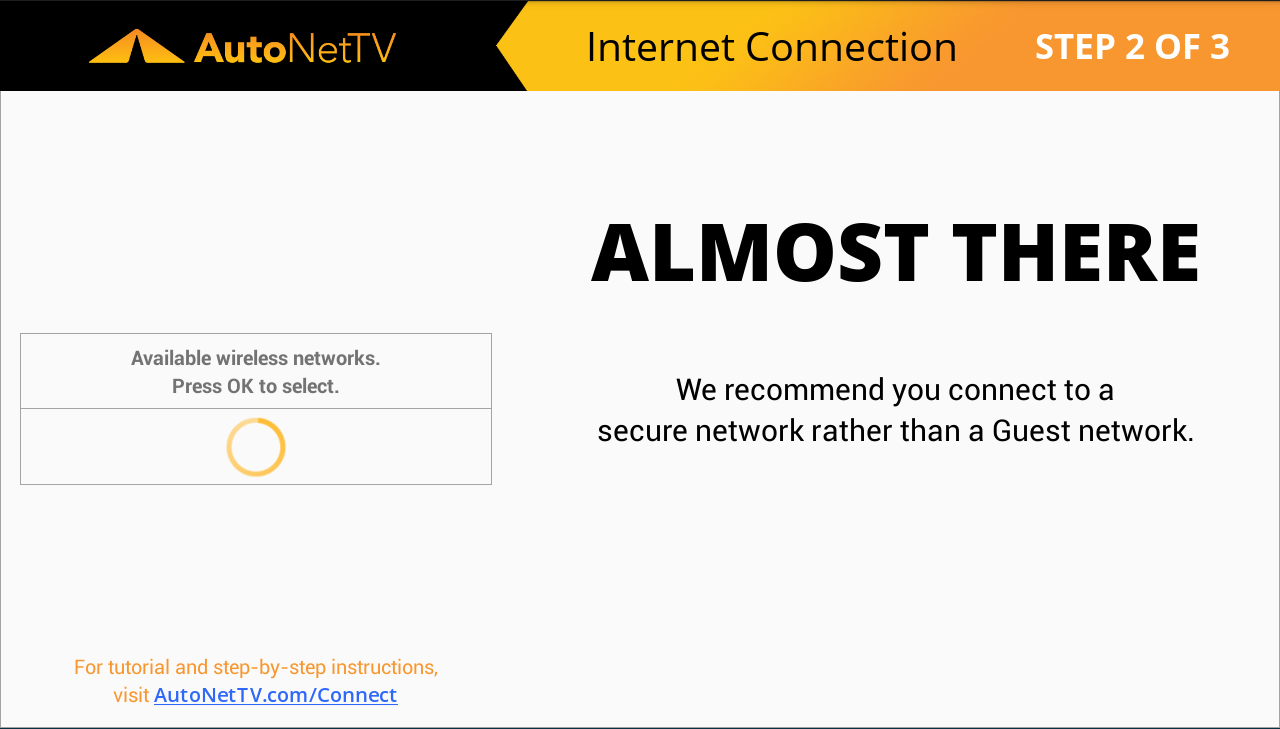
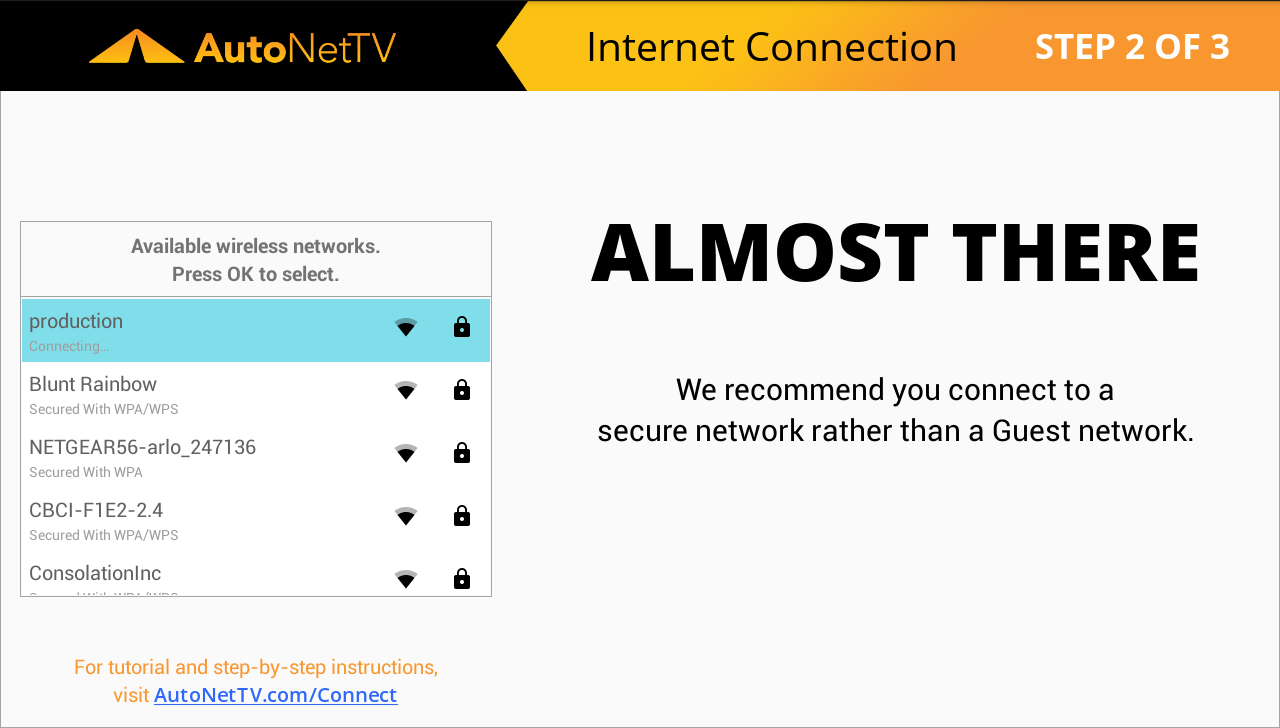
- For Wi-Fi (Wireless) connections, you must know your Wireless Network Name (SSID) and Password. We do not recommend using guest access wireless to connect.
- If you have any network security (restrictions, Static IP, VPN, MAC Filtering, etc.) you must know this information and have the settings available.
- The media player device - which includes its HDMI cable (for video/audio), power cable and remote control (which you'll need to make selections and enter information). This is shipped in a small, square white box from AutoNetTV.
- Your Player Activation Code. This code was sent to your email address upon signing up for an account with an AutoNetTV account rep. If you can't find that email, you can also login to your account at http://Drive.AutoNetTV.com (using your email address for the login - if you've forgotten your password, just click the Forgot Password to create a new one). Once logged in, click in the top right corner (where it says "Welcome {your name}" with an arrow next to it), and choose My Player Validation Codes from the drop down list. Activation/Validation Codes are assigned per location, per subscription or device type (a different code is used for Lobby TV vs Menu program).
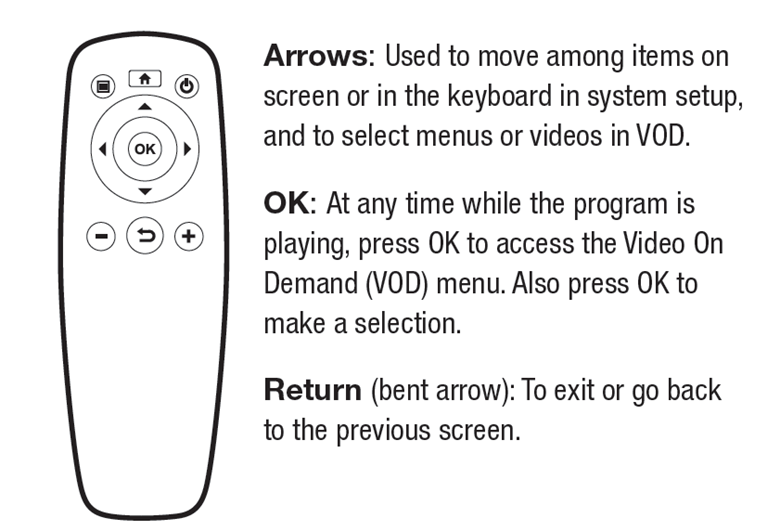
Remote Control
The included remote control has only a few buttons. You’ll never use the Home or Power buttons located at top, or the – and + buttons at the bottom. Here’s a description of each.
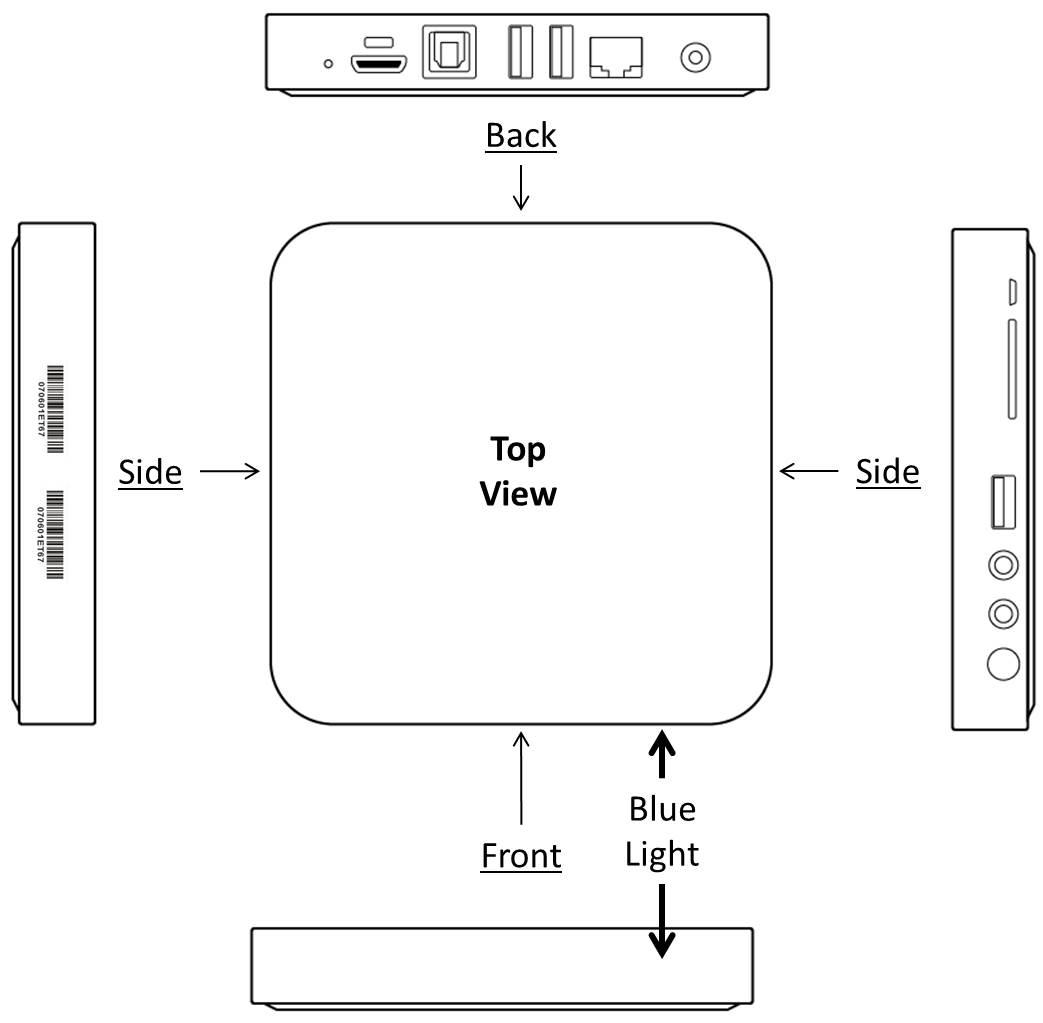
With your device connected to the TV and to Power (and your Wired Internet - if you are not connecting Wireless), point the remote control at the front of the device for the following registration steps. You will use this remote control to activate your player.
The following steps are on your TV Screen:
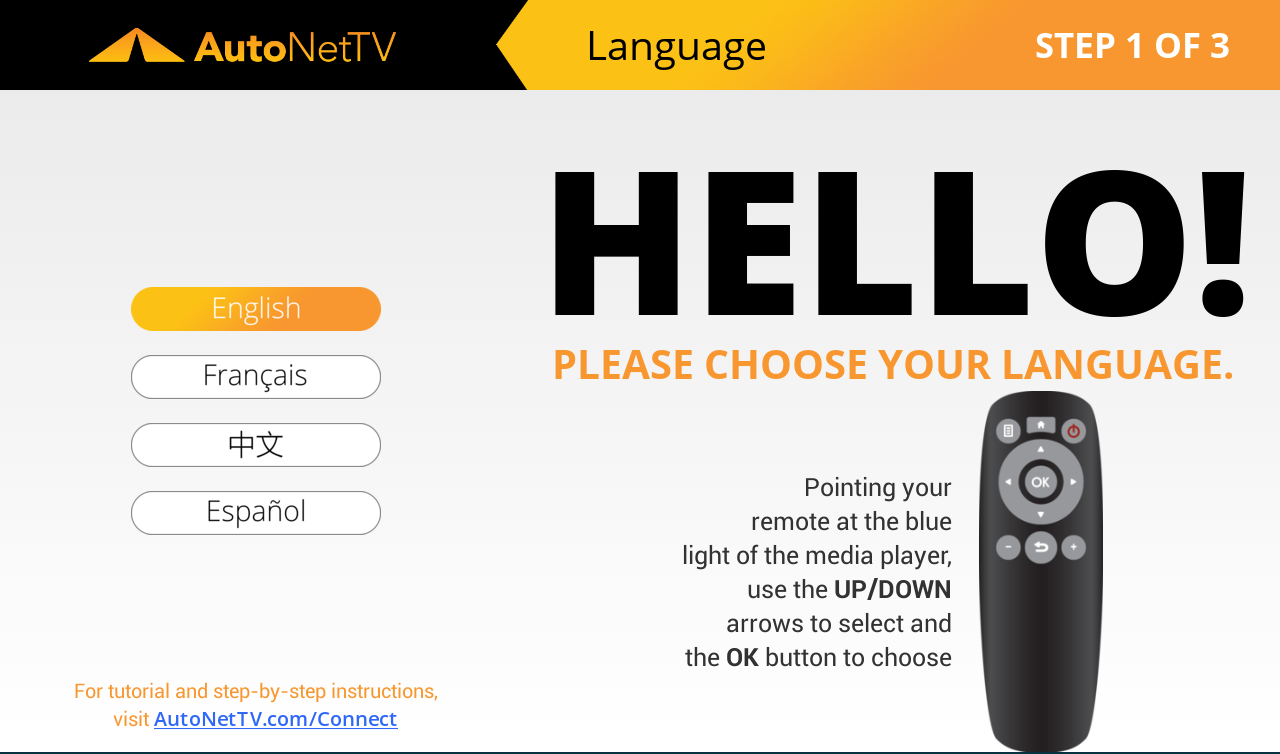
Screen 1 - Choose your language. Press the down arrow one time to highlight English, if this is your default language, and click the round OK button.
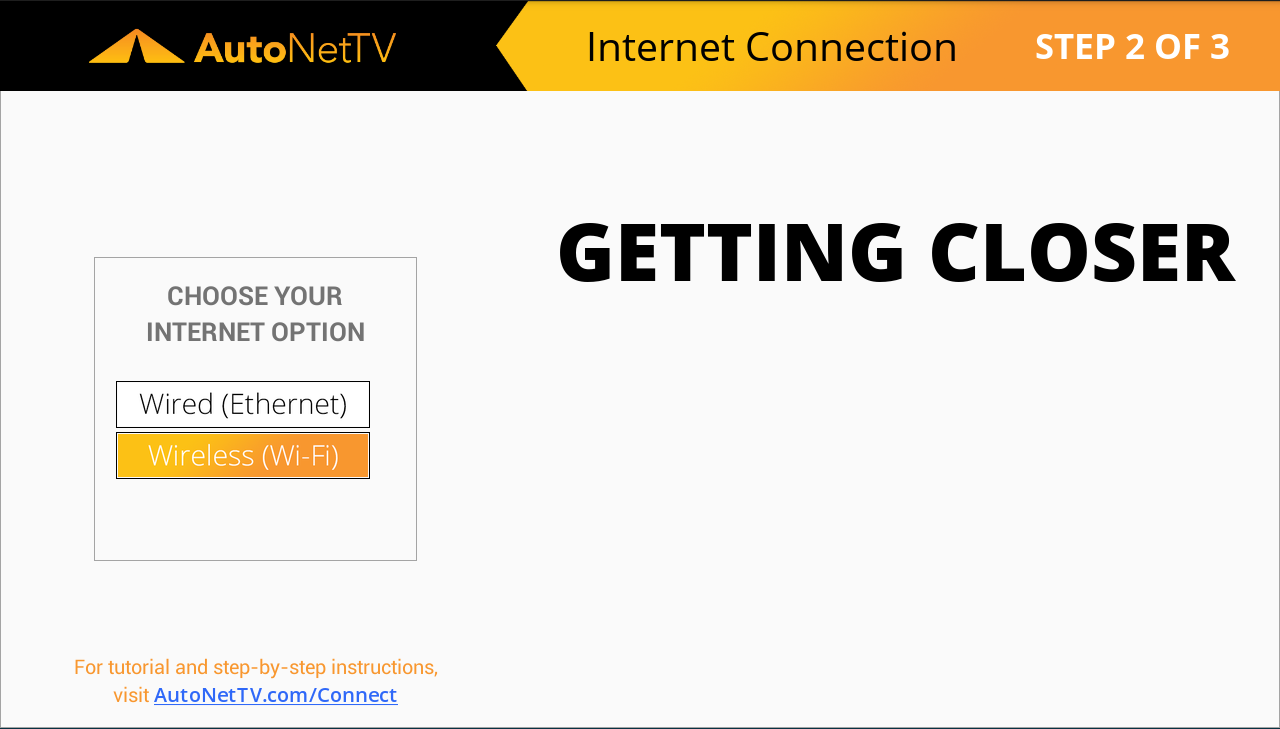
Screen 2 - Choose Internet Connection Type. Press the down arrow to highlight Wired (which requires an Ethernet cable to be plugged into the back of the device and into your router), or Wireless (Wi-Fi) if you will connect to an over-the-air router. If you already plugged in your Ethernet (for Wired), and there are no security restrictions on your network, the device will briefly show a green dot next to your connection, and automatically move to the Activation screen (Step 3).
Screen 3 - Wireless Network Discovery. If you choose Wireless, the device will look for available Wi-Fi networks.
Screen 4 - Wireless Network Selection. If you choose Wireless, the device will display the available Wi-Fi networks. Use the up/down arrows to highlight your desired Wi-Fi network, and then press the round OK button.
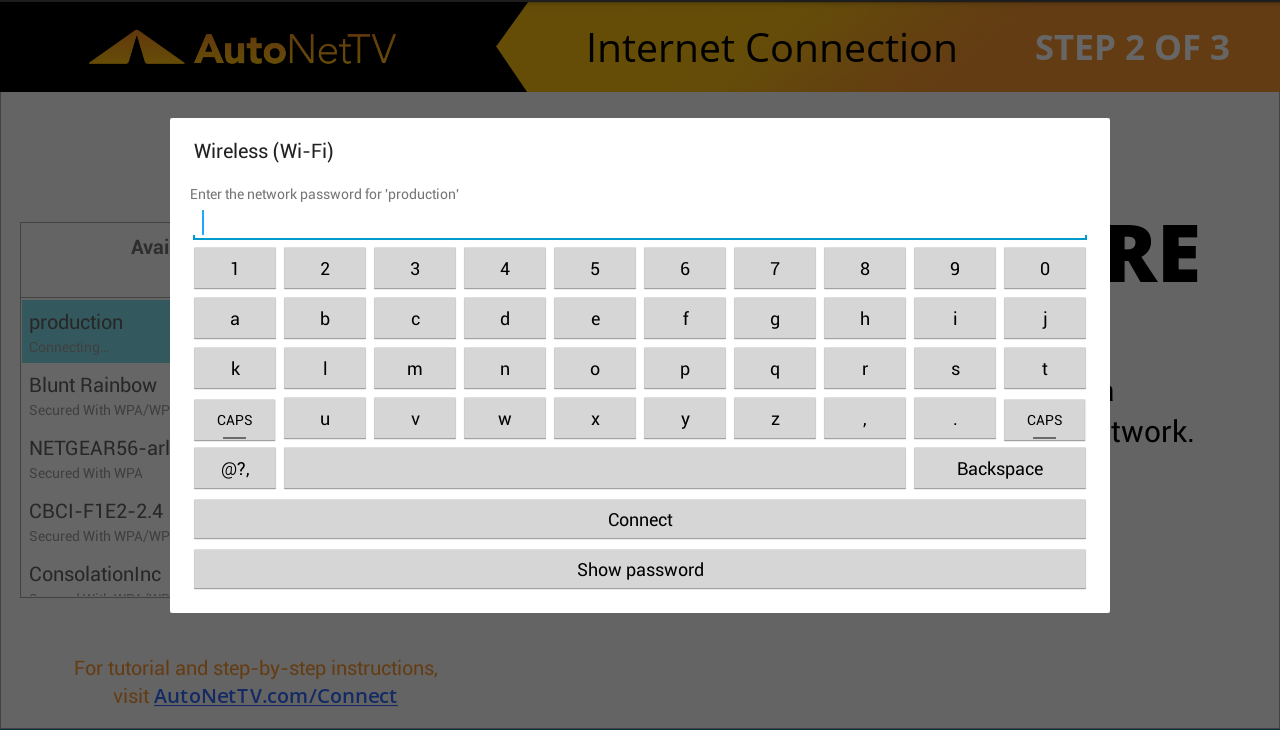
Screen 5 - Wireless Network Password. If you choose Wireless, the device will now prompt you to enter the password for the Wi-Fi network you just selected. Use the on-screen keyboard to enter your Wireless password. Use the @?, button to access special characters.
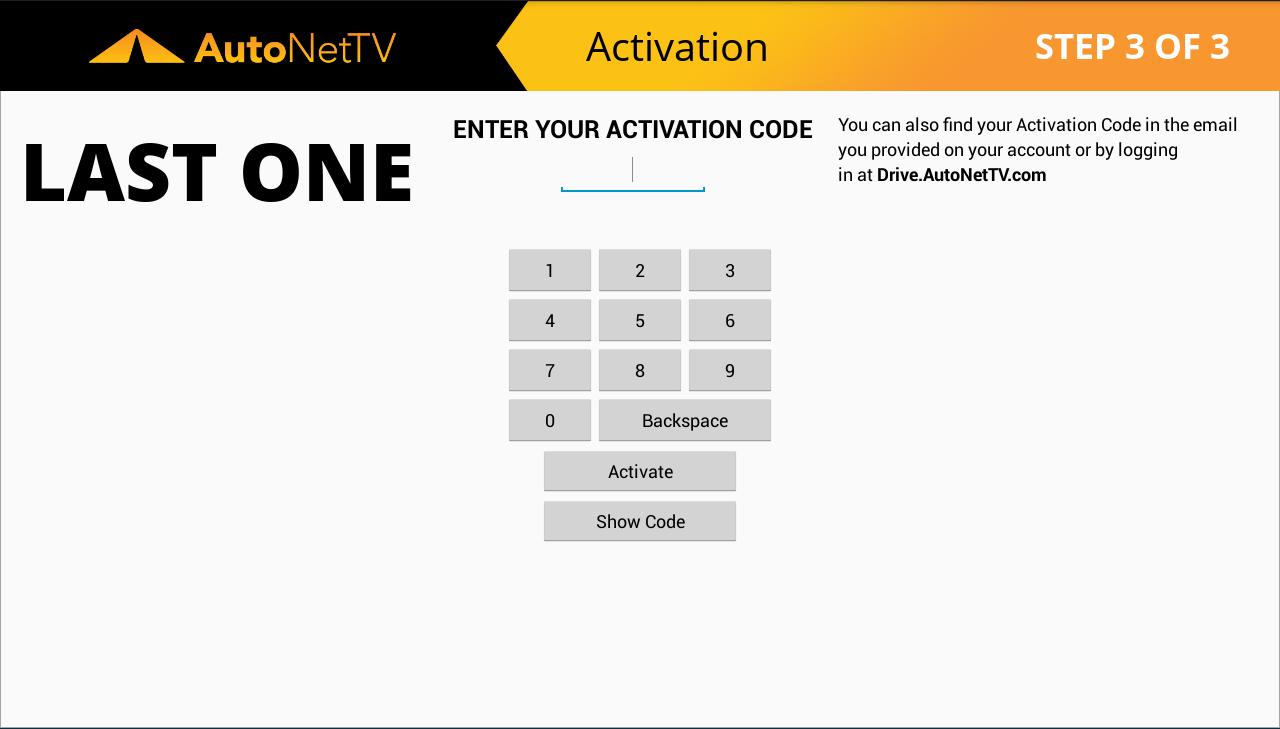
Screen 6 - Enter Activation Code. Last step - hooray. Enter the Player Validation Code found in the email sent when you signed up with an AutoNetTV account rep (it's also found online at http://Drive.AutoNetTV.com - in the top right corner after you login) and click the Activate button. Remember that the code is unique to either a Lobby TV or Menu program subscription - so if you have both subscriptions, the Lobby TV should be for your waiting area, and the Menu should go behind your service counter (usually).
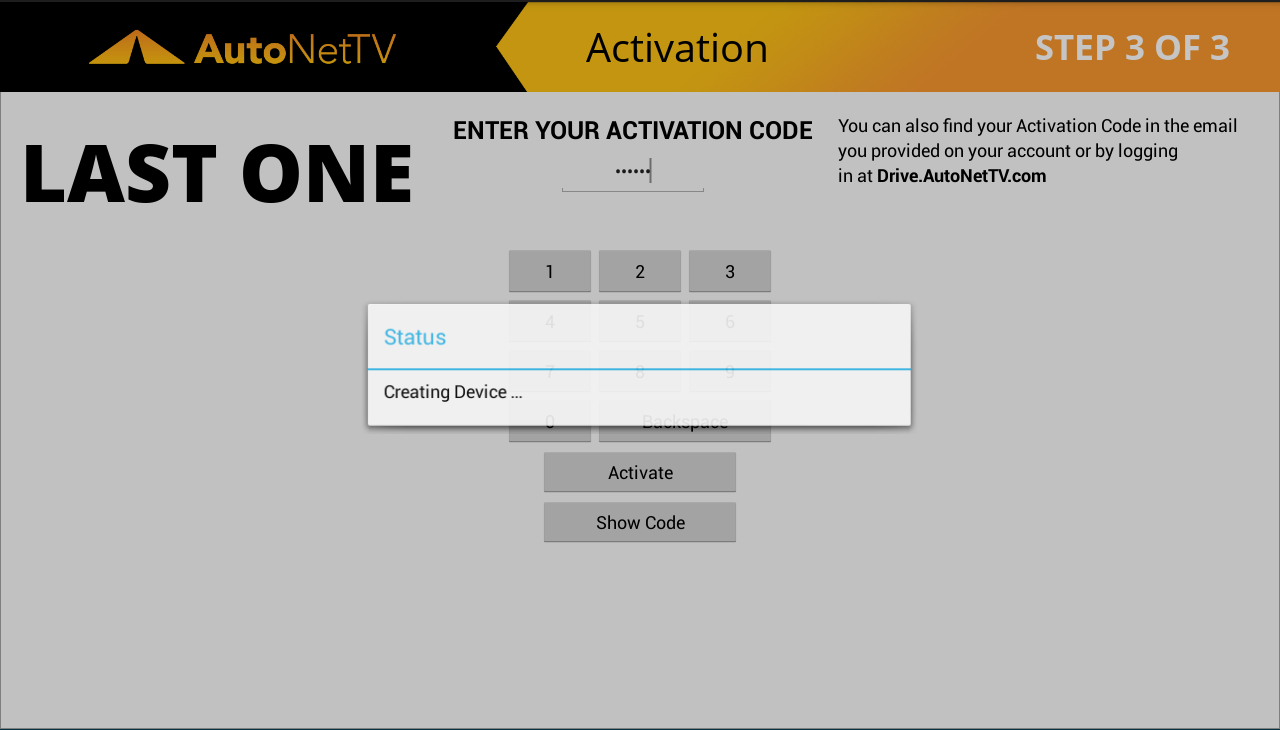
Screen 7 - Account Confirmation. Yep, it's just showing you that the Activation Code worked, and the device is being created to your online login account.
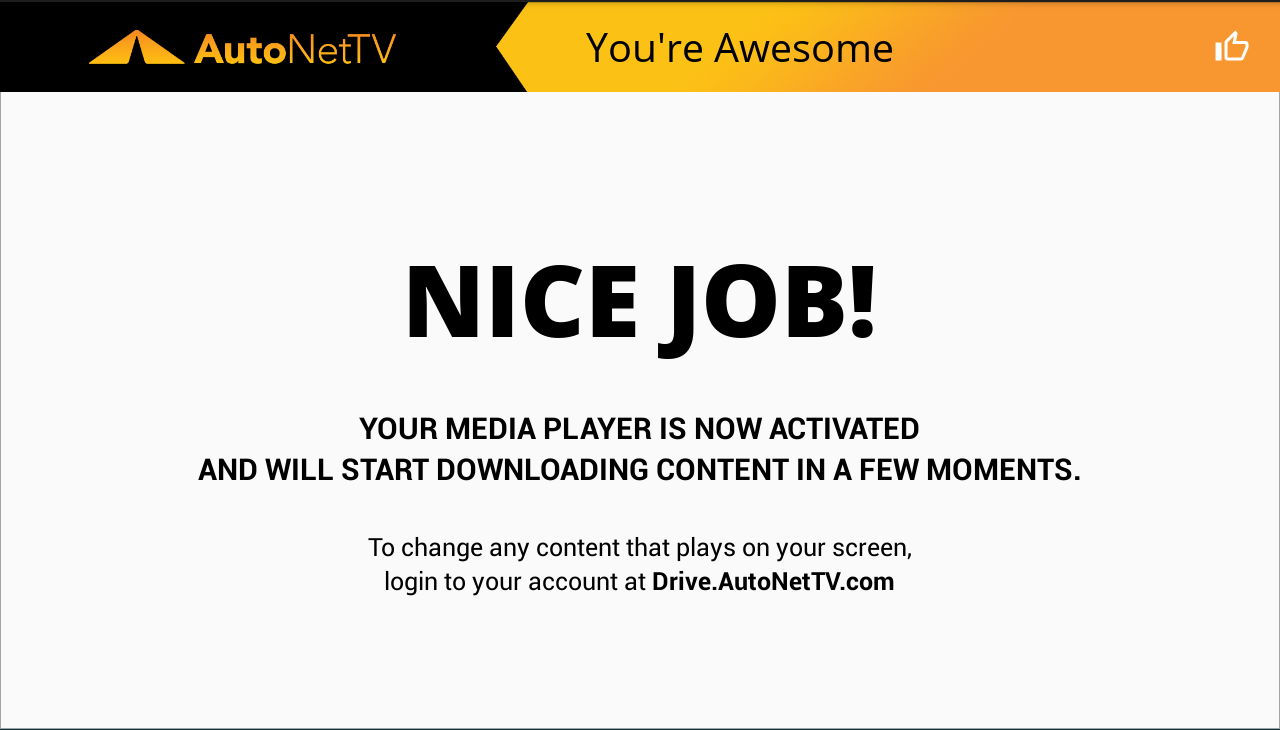
Screen 8 - All Done! Yes, you are awesome.
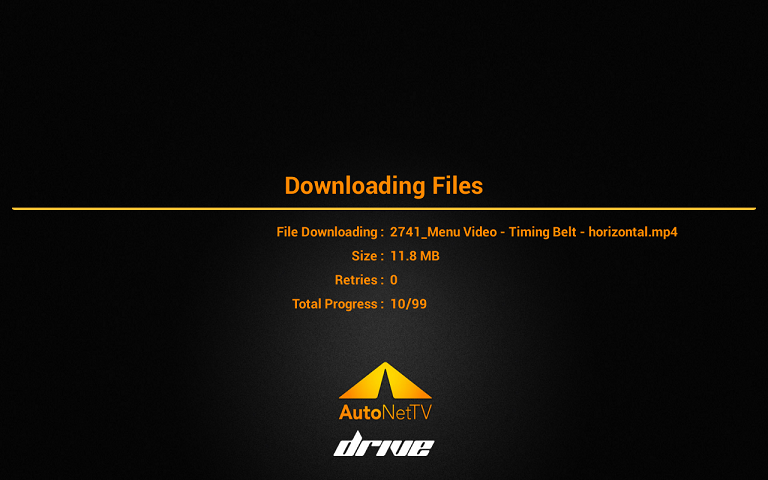
Screen 9 - File Download. Once activated, the device will connect to our servers and start downloading content for Video On Demand (VOD) and content that will rotate display on screen for your program playlist. To make any changes to your program, simply login to your account at http://Drive.AutoNetTV.com. The download time will depend on your Internet speed, and the program type (Lobby TV is a longer program, so it takes longer to download all the assets).
All done! We recommend you follow some tutorials for new users, to learn all the cool features and basics, by clicking here http://autonettv.com/newuser
If you have other questions, please search by any words or topics at http://support.autonettv.com/ to find tutorials and information.
For Internet Connection problems or issues, please find help at http://autonettv.com/internet
If you still have questions or need help, you can call us at (801) 492-9900, option 3, from 7 am - 5 pm (M-Th), and 7 am - 1 pm Fri, Mountain Time.
Customer support service by UserEcho